How To Set Up The Facebook Pixel
Thinking about getting started with Facebook Ads? The first thing that you should do is add the Facebook Pixel. The Facebook Pixel is a piece of code that can be added to a website to collect data, track visitors, optimize ads, and build highly targeted audiences.
The Facebook Pixel is one of the most powerful tools in marketing because of the amount of data it can collect both on and off of Facebook. The Pixel collects the behavior, interests, and demographics of all converted users. Facebook Pixel and Facebook’s algorithm can then target prospective customers based on past similar customers. This will help you and your company target the right customers and increase conversion rates, which in turn, will help increase ROI.
How to get started:
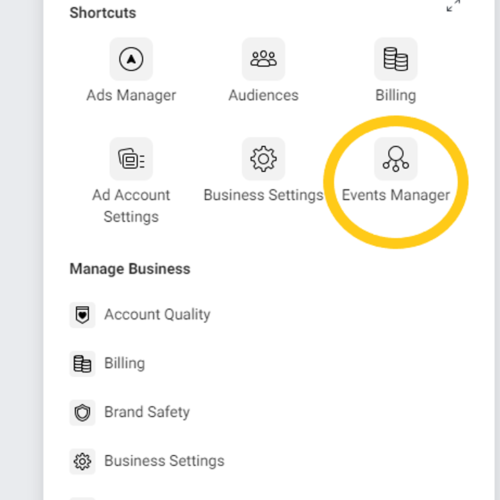
First, create a business manager account. The business manager accounts allows you to create and manage all of your Facebook marketing efforts in one place. Once logged into this account, navigate to the Events Manager tab at the top and select the Facebook Pixel options.

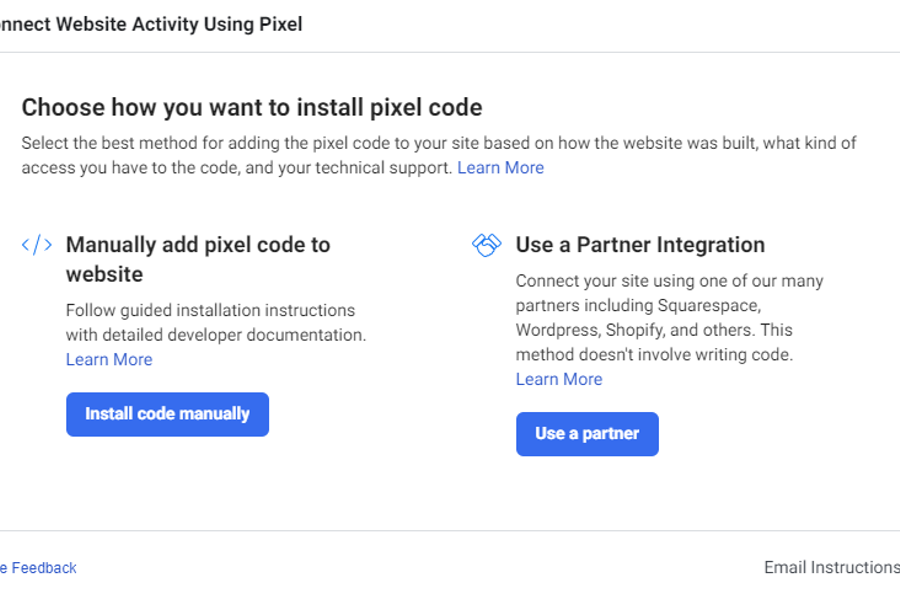
Next, give the pixel a name, with the option to add your website’s URL. The next step is to choose what method to utilize in installing the pixel code. These options include (1) partner integration (2) email instructions or (3) manual instructions.
- Add code using a partner integration – There are a number of partner integrations, such as Google Tag Manager, HubSpot, Shopify, Wix, etc. The set up process can vary from integration to integration, but you’ll likely need to go into that specific platforms settings, paste your Pixel ID, and follow the instructions. Aside from adding the Facebook Pixel to every page on your website, the most important step is “Set Up Events.” The Set Up Events section will be where you identify where your goals take place on the website.
- Email instructions – This is a great option if you have a developer or technical support team. Firt this option, just add the developer or technical support team’s email address and obtain the code when the instructions are sent. The developer should be familiar with the goals you would like to track and where on the website prospects can convert on those goals. For example, they should know on what page someone completes a registration or purchases a product. They will then add the appropriate standard event goal onto those goal pages. More on this later.
- Manually add the pixel code to website – This is essentially the same option as the email instructions option, except it walks you through the instructions.

Manually adding the pixel code yourself
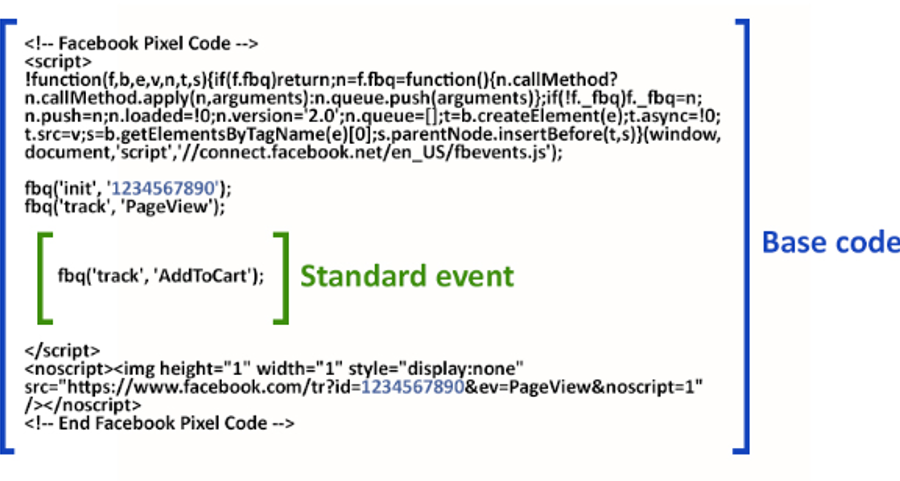
Once selecting the manual option, you will receive a Facebook Pixel code. Place this code on every page of your website in the header. If you already have code in your header, place the Facebook Pixel code at the bottom, right before the </head> tag. This code is very similar to every Facebook code, the only specific identifier to you is the Facebook Pixel base code, which is a string of numbers in a fbq(‘init’, ‘xxxxxxxxxxxxxxxx’); format. Next, add standard events to the code on specific pages in order to track your goals.
Facebook Pixel Standard Events
Standard events are used to build audiences, optimize your goals, and track conversions. Review the predefined standard event options and determine which events make the most sense for your business. Next, identify which pages on your website these events take place on. In the backend of your website, make sure to visit those pages and add the appropriate standard event code above the </script> tag in the Facebook Pixel. Remember to do this for every page you want to track. In summary, every page will have the Facebook Pixel base code, but the pages you want to specifically track will have other pieces of standard event code.

- Add payment info
- Code: fbq(‘track’, ‘AddPaymentInfo’);
- Add to cart
- Code: fbq(‘track’, ‘AddToCart’);
- Add to wishlist
- Code: fbq(‘track’, ‘AddToWishlist’);
- Complete registration
- Code: fbq(‘track’, ‘CompleteRegistration’);
- Contact
- Code: fbq(‘track’, ‘Contact’);
- Customize product
- Code: fbq(‘track’, ‘CustomizeProduct’);
- Donate
- Code: fbq(‘track’, ‘Donate’);
- Find location
- Code: fbq(‘track’, ‘FindLocation’);
- Initiate checkout
- Code: fbq(‘track’, ‘InitiateCheckout’);
- Lead
- Code: fbq(‘track’, ‘Lead’);
- Purchase
- Code: fbq(‘track’, ‘Purchase’, {value: 0.00, currency: ‘USD’});
- Add the purchase price in place of “0.00”
- Schedule
- Code: fbq(‘track’, ‘Schedule’);
- Search
- Code: fbq(‘track’, ‘Search’);
- Start trial
- Code: fbq(‘track’, ‘StartTrial’, {value: ‘0.00’, currency: ‘USD’, predicted_ltv: ‘0.00’});
- Add trial value and/or life time value in place of “0.00”
- Submit application
- Code: fbq(‘track’, ‘SubmitApplication’);
- Subscribe
- Code: fbq(‘track’, ‘Subscribe’, {value: ‘0.00’, currency: ‘USD’, predicted_ltv: ‘0.00’});
- Add subscription value and/or life time value in place of “0.00
- View content
- Code: fbq(‘track’, ‘ViewContent’);
Facebook Pixel Helper
Our last recommendation would be to add the Facebook Pixel Helper. This is a Google Chrome browser extension that helps you understand if your Facebook Pixel is set up correctly. It can identify if and how many Facebook Pixels are set up on a page.
